Vejledningen er under udarbejdelse og kommer snart.
You need to first connect the device you are going to perform the installation on (phone, tablet, computer, etc.), to the wifi network, named after your charge point.
Connect to Wi-Fi network VIARIS UNI, ORB-EVVC3nnnnnnnnnnnn
The “nnnnnnnnnnnn” stands for the serial number of the charge point.
The factory-established password for the VIARIS UNI Wi-Fi network is 12345678.
2. Open your browser to 192.168.4.1
Once connected to the Wi-Fi network, open a web browser and write 192.168.4.1, connecting to the charger control web. From there, you can see the charge point’s status, consumption, date and time, as well as manually control its start or completion of charging.
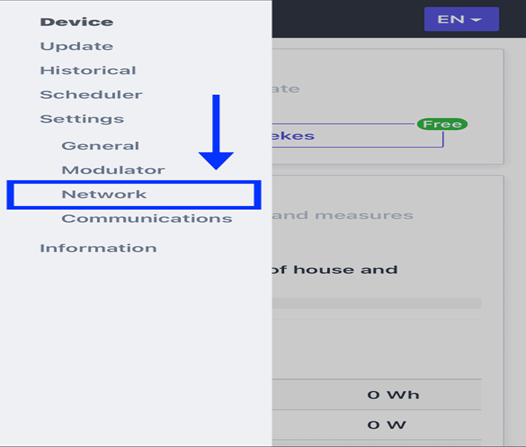
3. Open the “Network” settings
Now it is time to connect your charge point to your wifi network. To do so, please open the settings on the left and click on Network.
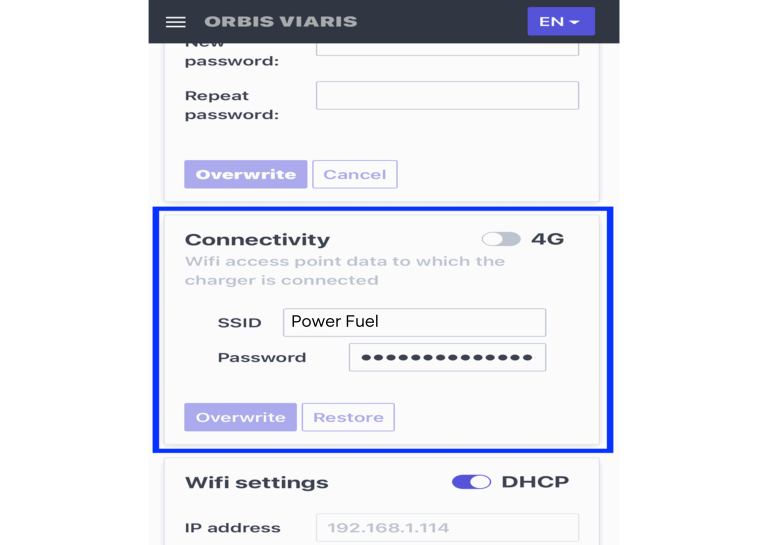
Once you open the Network tab, go to the “Connectivity” section of the page. There you need to insert your wifi’s details. Please note that the following screenshot includes an example of a wifi name.
SSID: Your wifi’s name
Password: Your wifi’s password
To save these settings, click on “Overwrite”.
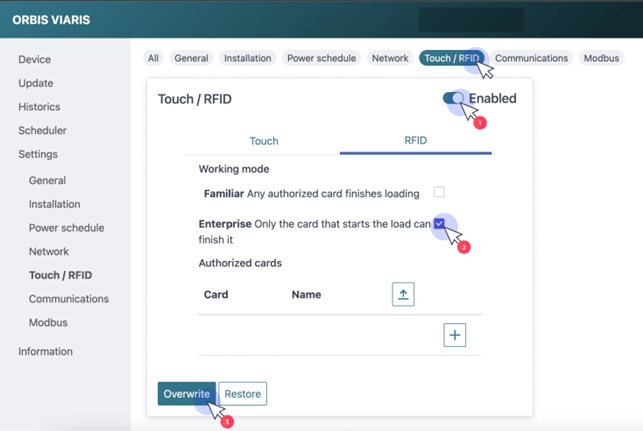
In the Settings, select “Touch/ RFID”.
Toggle on the “Enabled” switch.
Select “RFID”.
Check off “Enterprise”.
To finish the step, click on “Overwrite”.
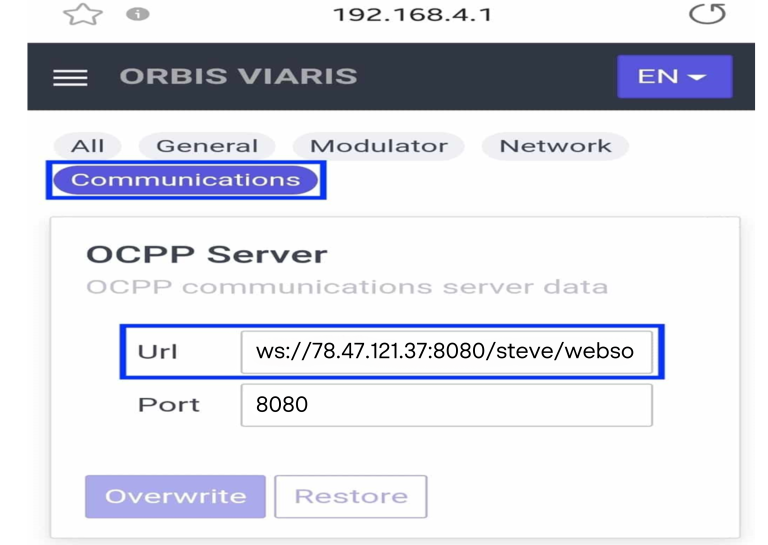
6. Under “Settings”, click on “Communications”
Vores elaftale
Med vores elaftale får du en elpris, der opdateres time for time baseret på markedspriserne på den nordiske elbørs, Nord Pool. Det giver dig mulighed for at vælge at bruge strøm, når prisen er lavest.
Den pris, der vises, er gennemsnitsprisen fra sidste måned. Derfor vil den faktiske pris, du betaler, når din elaftale træder i kraft, afvige fra den viste pris.
Elprisen består af:
Timeprisen for rå el: 58,80 øre / kWh
Tillæg: 5 øre / kWh
Den gennemsnitlige elpris i Østdanmark (DK2) hos Power Fuel var 63,80 øre/kWh sidste måned.
Derudover skal du betale for handelsomkostninger, transport og afgifter:
Transport 46,11 øre / kWh
Handel: 3,75 øre / kWh
Afgifter: 90 øre / kWh
Samlet pris: 2,04 kr./kWh + 29 kr. om måneden.
Din samlede elregning vil være sammensat af elprisen, handelsomkostninger, transport, afgifter og abonnementer.
Elprisen
“Rå el” henviser til den timepris, der gælder på den nordiske elbørs, Nord Pool. Det er den grundlæggende pris for strømmen uden ekstra omkostninger. Tillægget dækker dét, som vi som elselskab opkræver for at levere strømmen til dig.
Handelsomkostninger
Handelsomkostningerne dækker de udgifter, vi har ved at købe strøm gennem Energi Danmark på elbørsen. Derudover omfatter de omkostningerne ved eventuelle forskelle mellem de estimerede og faktiske forbrug samt finansieringsomkostninger forbundet med handelen. Handelsomkostningerne for den aktuelle periode er 3,75 øre/kWh, og disse udgifter videresendes til dig uden yderligere tillæg eller profit.
Handelsomkostningerne bliver justeret automatisk to gange om året (1. januar og 1. juli) for at afspejle de faktiske udgifter forbundet med handlen.
Transport og afgifter
Alle elselskaber er forpligtede til at opkræve transport og afgifter på vegne af dit lokale elnetselskab, Energinet og staten. Vi opkræver disse beløb og videresender dem uændret og uden gebyrer.
I vores eksempel anvender vi elnetselskabet N1 (46,11 øre/kWh ved et forbrug på 4.000 kWh), elafgiften på 90 øre/kWh, og moms er inkluderet i alle beløb.
Abonnement og betalingsform
Uanset dit elforbrug betaler du hos Power Fuel 29 kr. om måneden i abonnement samt et eventuelt gebyr for den betalingsmetode, du har valgt.
Vores elaftale
Med vores elaftale får du en elpris, der opdateres time for time baseret på markedspriserne på den nordiske elbørs, Nord Pool. Det giver dig mulighed for at vælge at bruge strøm, når prisen er lavest.
Den pris, der vises, er gennemsnitsprisen fra sidste måned. Derfor vil den faktiske pris, du betaler, når din elaftale træder i kraft, afvige fra den viste pris.
Elprisen består af:
Timeprisen for rå el: 59,89 øre / kWh
Tillæg: 5 øre / kWh
Den gennemsnitlige elpris i Vestdanmark (DK1) hos Power Fuel var 64,89 øre/kWh sidste måned.
Derudover skal du betale for handelsomkostninger, transport og afgifter:
Transport 46,11 øre / kWh
Handel: 3,75 øre / kWh
Afgifter: 90 øre / kWh
Samlet pris: 2,05 kr./kWh + 29 kr. om måneden.
Din samlede elregning vil være sammensat af elprisen, handelsomkostninger, transport, afgifter og abonnementer.
Elprisen
“Rå el” henviser til den timepris, der gælder på den nordiske elbørs, Nord Pool. Det er den grundlæggende pris for strømmen uden ekstra omkostninger. Tillægget dækker dét, som vi som elselskab opkræver for at levere strømmen til dig.
Handelsomkostninger
Handelsomkostningerne dækker de udgifter, vi har ved at købe strøm gennem Energi Danmark på elbørsen. Derudover omfatter de omkostningerne ved eventuelle forskelle mellem de estimerede og faktiske forbrug samt finansieringsomkostninger forbundet med handelen. Handelsomkostningerne for den aktuelle periode er 3,75 øre/kWh, og disse udgifter videresendes til dig uden yderligere tillæg eller profit.
Handelsomkostningerne bliver justeret automatisk to gange om året (1. januar og 1. juli) for at afspejle de faktiske udgifter forbundet med handlen.
Transport og afgifter
Alle elselskaber er forpligtede til at opkræve transport og afgifter på vegne af dit lokale elnetselskab, Energinet og staten. Vi opkræver disse beløb og videresender dem uændret og uden gebyrer.
I vores eksempel anvender vi elnetselskabet N1 (46,11 øre/kWh ved et forbrug på 4.000 kWh), elafgiften på 90 øre/kWh, og moms er inkluderet i alle beløb.
Abonnement og betalingsform
Uanset dit elforbrug betaler du hos Power Fuel 29 kr. om måneden i abonnement samt et eventuelt gebyr for den betalingsmetode, du har valgt.

Vi har samlet vores skarpeste sparetips i en e-bog. Indtast din email, så sender vi den til dig!
Med vores refusionsaftale får du:
✓ Få refusion på 76 øre / kWh – tilvælg vores el- og refusionsaftale og få den fulde refusionssats på 95 øre / kWh.
✓ Kundeservice som har åbent 24/7
✓ Automatisk planlægning af ladning
✓ Følg dit forbrug time for time i vores app
Du vil blive kontaktet af vores installationsteam indenfor 2 arbejdsdage i hverdagene i tidsrummet kl. 8.00-15.00
Vores premium installation indeholder:
✓ Kørsel til adressen (tillæg ved ikke bro-faste øer).
✓ Oplægning af 10 meter 5G4mm kabel
✓ (Kablet mellem din eltavle og ladestanderen)
✓ Installation af sikring i din eksisterer eltavle.
✓ Opsætning og montering af din ladeboks.
✓ Konfigurering og test af din ladeboks.
✓ Gennemgang af hvordan din ladeboks virker med Power Fuel App.
Læs også den fulde beskrivelse her:
powerfuel.stagingkiss.dk/premium-installation
Har du bestilt en udskiftning af eksisterende ladeboks, nedtager vi din eksisterende ladeboks og sætter din nye ladeboks op samme sted. Vores elektriker konfigurerer og tester iht. gældende lovgivning.
Hej, beklager at siden ser lidt speciel ud – Vi arbejder på det
08/04-2024